 |
| October 08, 2013 | Volume 09 Issue 38 |
Designfax weekly eMagazine
Archives
Partners
Manufacturing Center
Product Spotlight
Modern Applications News
Metalworking Ideas For
Today's Job Shops
Tooling and Production
Strategies for large
metalworking plants
Injection-molded parts on a budget:
The top 5 money-saving tips for Protomold parts
By Gus Breiland, Customer Service Engineer Manager, Proto Labs
We are often asked, "How can I get my parts made for less money?" This design tip shows you the best ways to cut costs from your Protomold project. A word of warning: Most of the ways to save involve changing the design of your part. Obviously, if your part needs to be a certain way, it needs to be that way. On the other hand, if you have flexibility in your design constraints, there are many ways to save.
Get your free Protomold Design Cube, which showcases a range of available surface finishes and examples of good and bad form.
As you consider these tips, you need to keep your end use of the parts in mind. Two major constituent groups use Proto Labs: people who need prototype parts and people who need short-run or bridge production parts. Within the prototyping constituency, there are subgroups interested in fit, appearance evaluation, process validation, strength testing, and so on. Saving money by eliminating a cosmetic finish might be just fine for a prototype part used for strength testing, while it would not make sense for a prototype case used in a marketing sample. For prototypes, minimizing the tooling cost usually makes the most sense. For people who need production parts, it might make sense to incorporate ideas to reduce per-part costs even if the cost of the tool increases as a result.
In no particular order, here are the five money-saving tips we most often give our customers:
1. Design all the undercuts out of your part. We have to charge more to add side action cams, bump-offs, and pick-outs to your tool to create undercuts. In the case of pick-outs, we also charge a per-part fee to keep a person standing at the press inserting pick-outs into the tool before each shot and then removing them from each part after molding (see Figure 1).
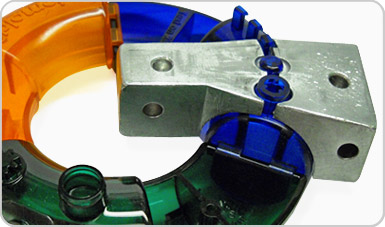
Figure 1: The two-piece pick-out used to create the features of this part must be manually removed from the part after ejection, and therefore adds cost.
2. Make the part smaller. If you can make the part smaller, there are multiple cost benefits: smaller parts fit in smaller tool bases, saving tool material cost; smaller parts have smaller cavities, and therefore less milling time is needed to create the cavity; smaller parts use less material; and so on.
3. Take details out of the part, especially small or fine detail. Protomold supports features as small as .020 in. (.50 mm). Fine detail is created using tiny end mills. Tiny stubby end mills cut very slowly, and longer tiny end mills, needed to reach fine detail deeper in the part, cut even slower. You may reduce milling time by keeping your geometry thicker than .050 in. (1.27 mm). Using our free ProtoQuote design analysis allows you to compare the cost of a more complex geometry to a modified cost-focused geometry. You can view a sample ProtoQuote here.
Text is very time consuming to mill, especially text recessed into the part. Logos are similar to text, and avoiding them will also reduce milling cost. Sometimes EDM (electrical discharge machining) electrodes are suggested instead of milling for small text features in tools. This is not a cost-reduction strategy, since the electrodes must also be milled and the EDM process requires an extra step.
Another detail that can add cost is ribs. Ribs require slots to be milled into the tool, and thinner and deeper slots need smaller and longer end mills, which cut more slowly. If smaller ribs can be combined and fewer larger ribs can be used instead, the tool cost is usually reduced. If the objective of ribs is to core the part to reduce production material usage, AND you care less about per-part cost than up-front tooling cost, AND you can live with possible sink or warp, then you may decide to make a thicker solid part and eliminate some ribs altogether.
One of our customer service engineers sums up the detail-elimination technique as: "Less waffle, more pancake." Of course, if what you're making is a waffle iron ...
4. Use lower grade finishes for your part. Finishes are applied to our tools by hand, which is an expensive process. If your part is not cosmetic, don't use a costly high-cosmetic finish. If the end use of the part is cosmetic, but the immediate use is non-cosmetic (for example, a bezel initially used for fitment or ergonomic tests), select a lower end finish. We can always add a better finish to the tool after your design is finalized. If you don't know what the different finishes look like, check your Protomold design cube. All of the standard Protomold finishes are on the cube. If you don't have a design cube, your sales person or customer service rep can send you one. We also have sample plaques showing what different finishes look like in different standard materials (see Figure 2).
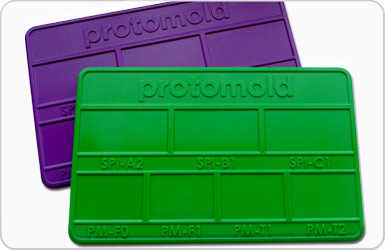
Figure 2: Our material sample plaques show seven different finishes offered by Protomold. Talk to your sales rep if you are interested in receiving samples.
5. Consider secondary operations. Surprisingly, depending on the quantity required, you may find it faster or more cost effective to use a secondary operation to complete your parts rather than having the part molded complete. For example, you could drill a hole after molding rather than use a side action or pick-out. Another example might be to cut an internal undercut in a secondary operation rather than a pick-out. Sometimes, you can create a "parent" part and then machine it to form different "children," or variants, so you can use a single mold to create a product line. You might be able to machine-in a bump-off feature rather than have an undercut mold made. Please note that Protomold does not do secondary operations.
Review our library of past Design Tips for other money-saving ideas. These mostly technical tips talk about techniques such as simulating undercuts using sliding shutoffs, how to design functional external threads in a straight-pull tool, coring parts to reduce material usage, eliminating part numbers by making matched mating parts, and so on.
Read past Protomold Design Tips here.
Want more information? Click below.
Published October 2013
Rate this article
View our terms of use and privacy policy